This manual will walk you through the key features of the Attendance report agenda and its effective use in everyday practice. You will learn:
How to work with attendance data - recording and editing of passages, manually adding absence, working with daily data.
How to correctly use recalculations - the difference between recalculation to today, yesterday and end of period.
How to edit records in bulk - adding events to more people at once, changing the regulations.
How to navigate the side panel and its notifications - summary information about the state of the period, warnings according to the Labor Code, etc…
How the system works in the background - automatic recalculations, reasons and appropriate moments for manual intervention.
The manual is intended for people responsible for managing and closing attendance - usually payroll accountants, HR managers or executives. It will help you understand not only the individual features.
Elements for controlling the list are available in the top panel. For a detailed description, please refer to the manual General control of elements:
General control of elements
This manual serves as a guide for the general use of the Aktion user interface. It includes instructions for filtering, grouping, and layout.
By clicking the button (see image below), you will open the side panel for value summaries.


This tab displays the data for the entire month.
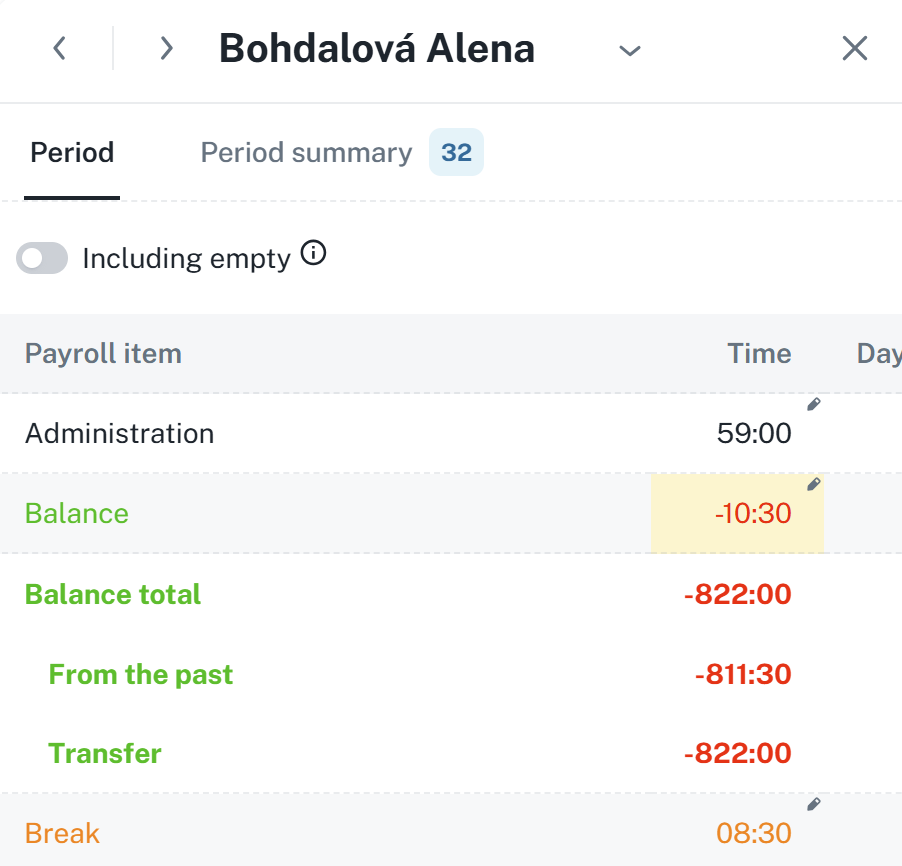
If a value has a pencil icon next to it, you can edit it. After clicking on the value, a dialog will show up.
The value’s background will turn yellow after editing.

Used to track:
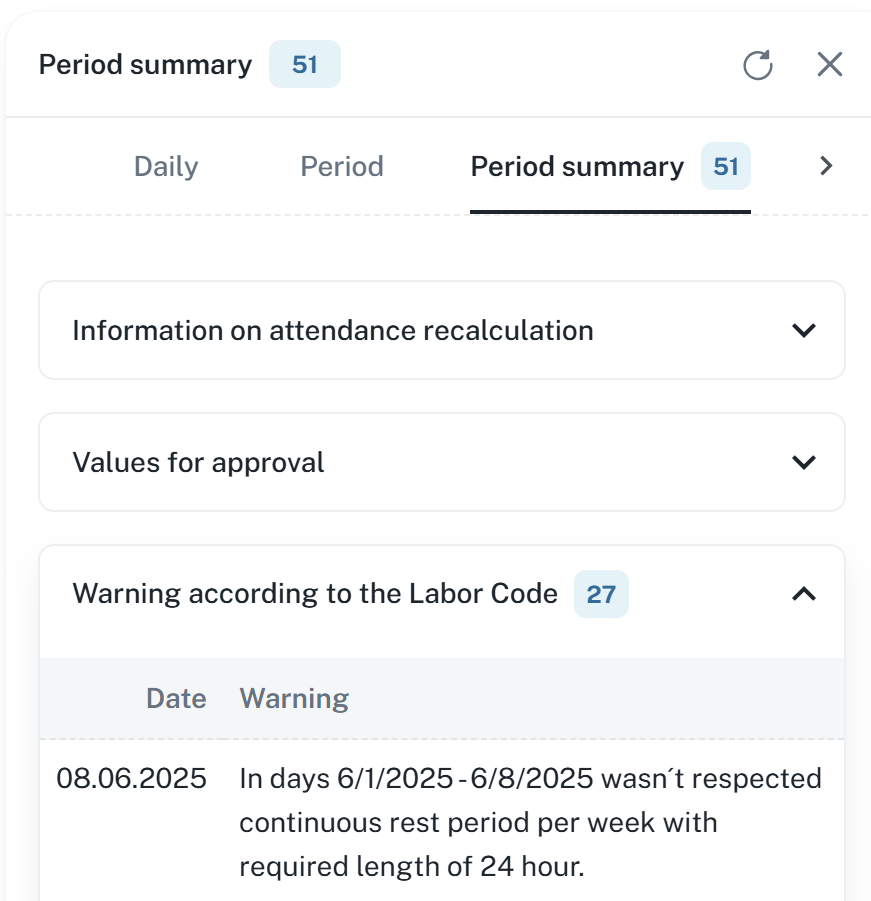
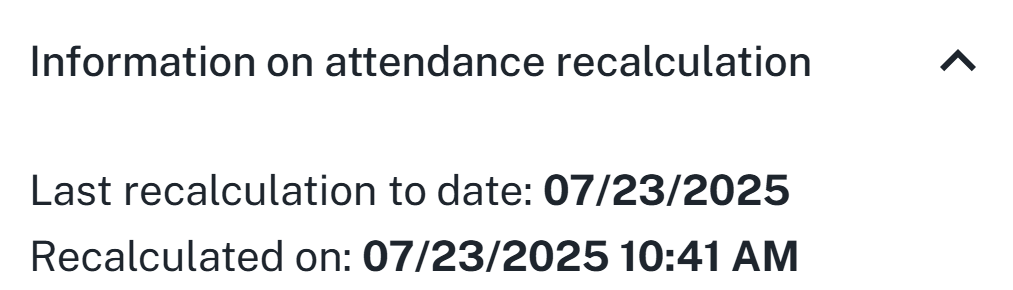
Attendance recalculation - Date of the last recalculation along with the date of attendance recalculation.
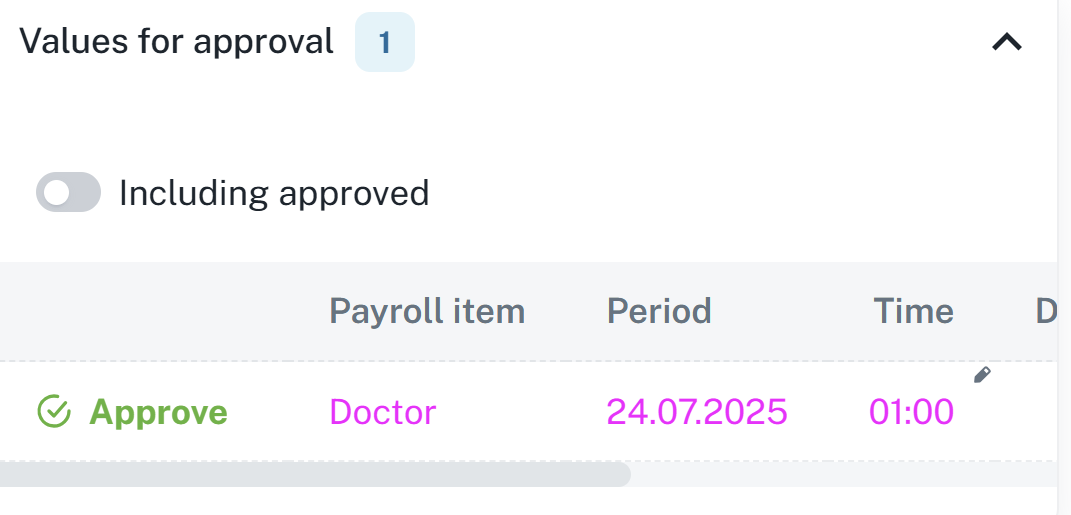
Values for approval - Used to approve values
Warning according to the Labor Code - Displays warning according to the Labor code, e.g. failure to observe continuous rest, etc…
Attendance warnings - Warnings such as generated passage, unfullfilled fund, etc…
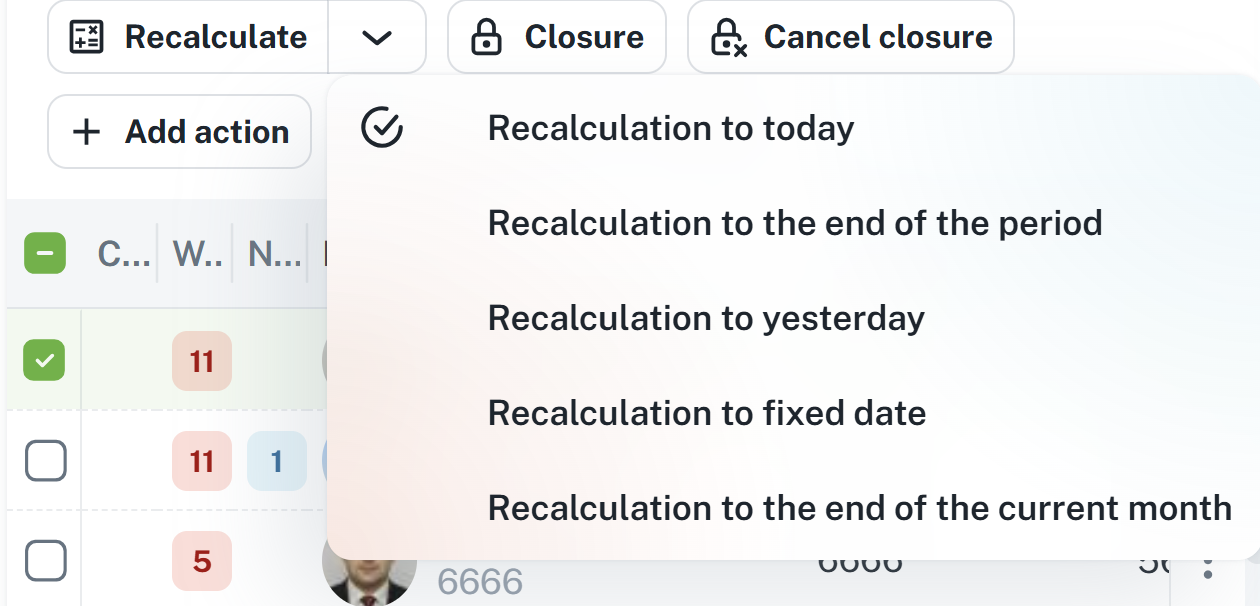
The recalculation of attendance data is performed automatically in the background after each entry of a specific individual and after manual addition/editing of entries and saving of changes. The process can be initiated manually by pressing the Recalculate button (Recalculation until the end of the period/Recalculation until today/Recalculation until yesterday).
If you are closing attendance before the end of the period, press the Recalculation to the end of the period button, and the person's attendance data will be recalculated until the end of the current period, i.e., until the end of the month in the case of monthly attendance. Afterwards, please verify that the data for the final days of the month have also been calculated.
Example of use: An employee has a vacation during the last 2 weeks of the month, and you need to close his/her attendance now and further process it before the end of the given period.
If you are closing attendance as of today, press the Recalculation until today button, and the time entries for this day will be generated according to the employee’s attendance policy. You can then close the attendance and work with it further.
Example of use: The employee’s attendance schedule is THP from 7:00 (end 15:30). The employee arrived at work at 7:00, but it is uncertain what time he will leave work, and the accountant already needs to close his attendance for today and further process it. Therefore, the function Recalculation up to today will be used and the employee’s departure will be generated according to his attendance schedule (15:30). If the employee leaves earlier or later, the balance will be recalculated in the next accounting period.
If you are closing attendance up to yesterday, press the Recalculation to yesterday button and only the employee's real entries will be present in the attendance data for the closing. After recalculation, it is possible to close the attendance and continue working with it.
Example of use: To close attendance, you need to use only real data and do not want to close the attendance for the employee with entries that would be generated.
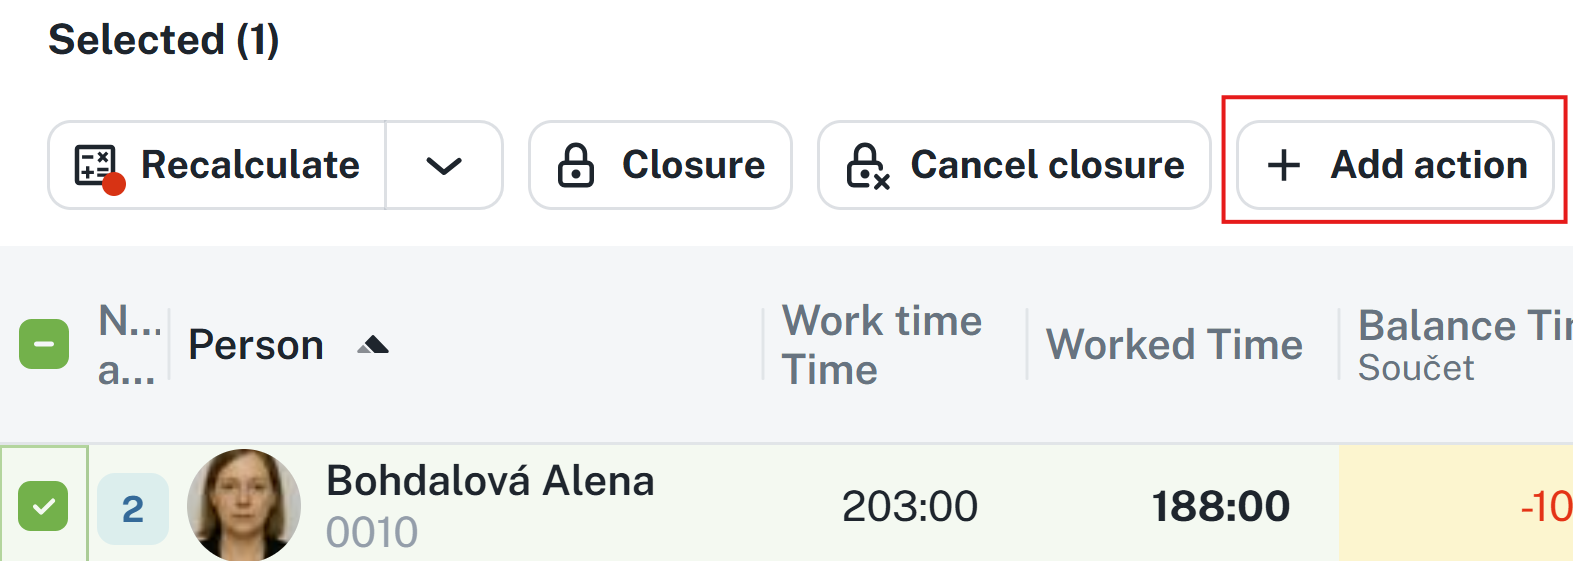
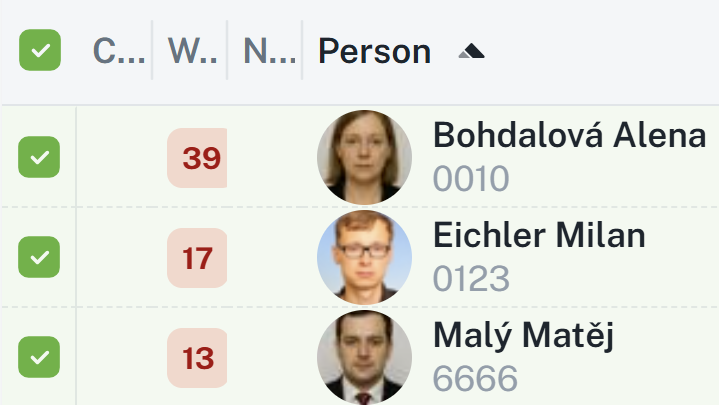
Before running the Recalculate function, you must first select the persons for whom you wish to use the function (you may select all at once by using the checkbox in the upper left corner of the table).
If you select Recalculation until the end of the period, the record will be recalculated according to the selected period (for example, July 2025).
Select time period.
Select person(s) to whom the recalculation applies.
Click the arrow next to the Recalculate button → select Recalculate up to today / Recalculate until the end of the period / Recalculate up to yesterday.
Click the Recalculate button.

The data has now been recalculated and is prepared for further use (e.g. for closing, exporting, etc.).
There are three basic types of passages, which are visually differentiated by icons or color highlight:
Passage created by a software terminal or a physical hardware doesn’t have a flag.

Created by editing a passage or manual creation by a button. Has a person icon flag.

Created by generating a passage according to a shift, generating the starts of interruption to next days, etc…
Has a blue lightning icon flag.

Adding a passage and action is used to manually add data to attendance records (e.g., an employee did not use the attendance scanner, planned vacation).
A passage can be added by clicking the Add action button.

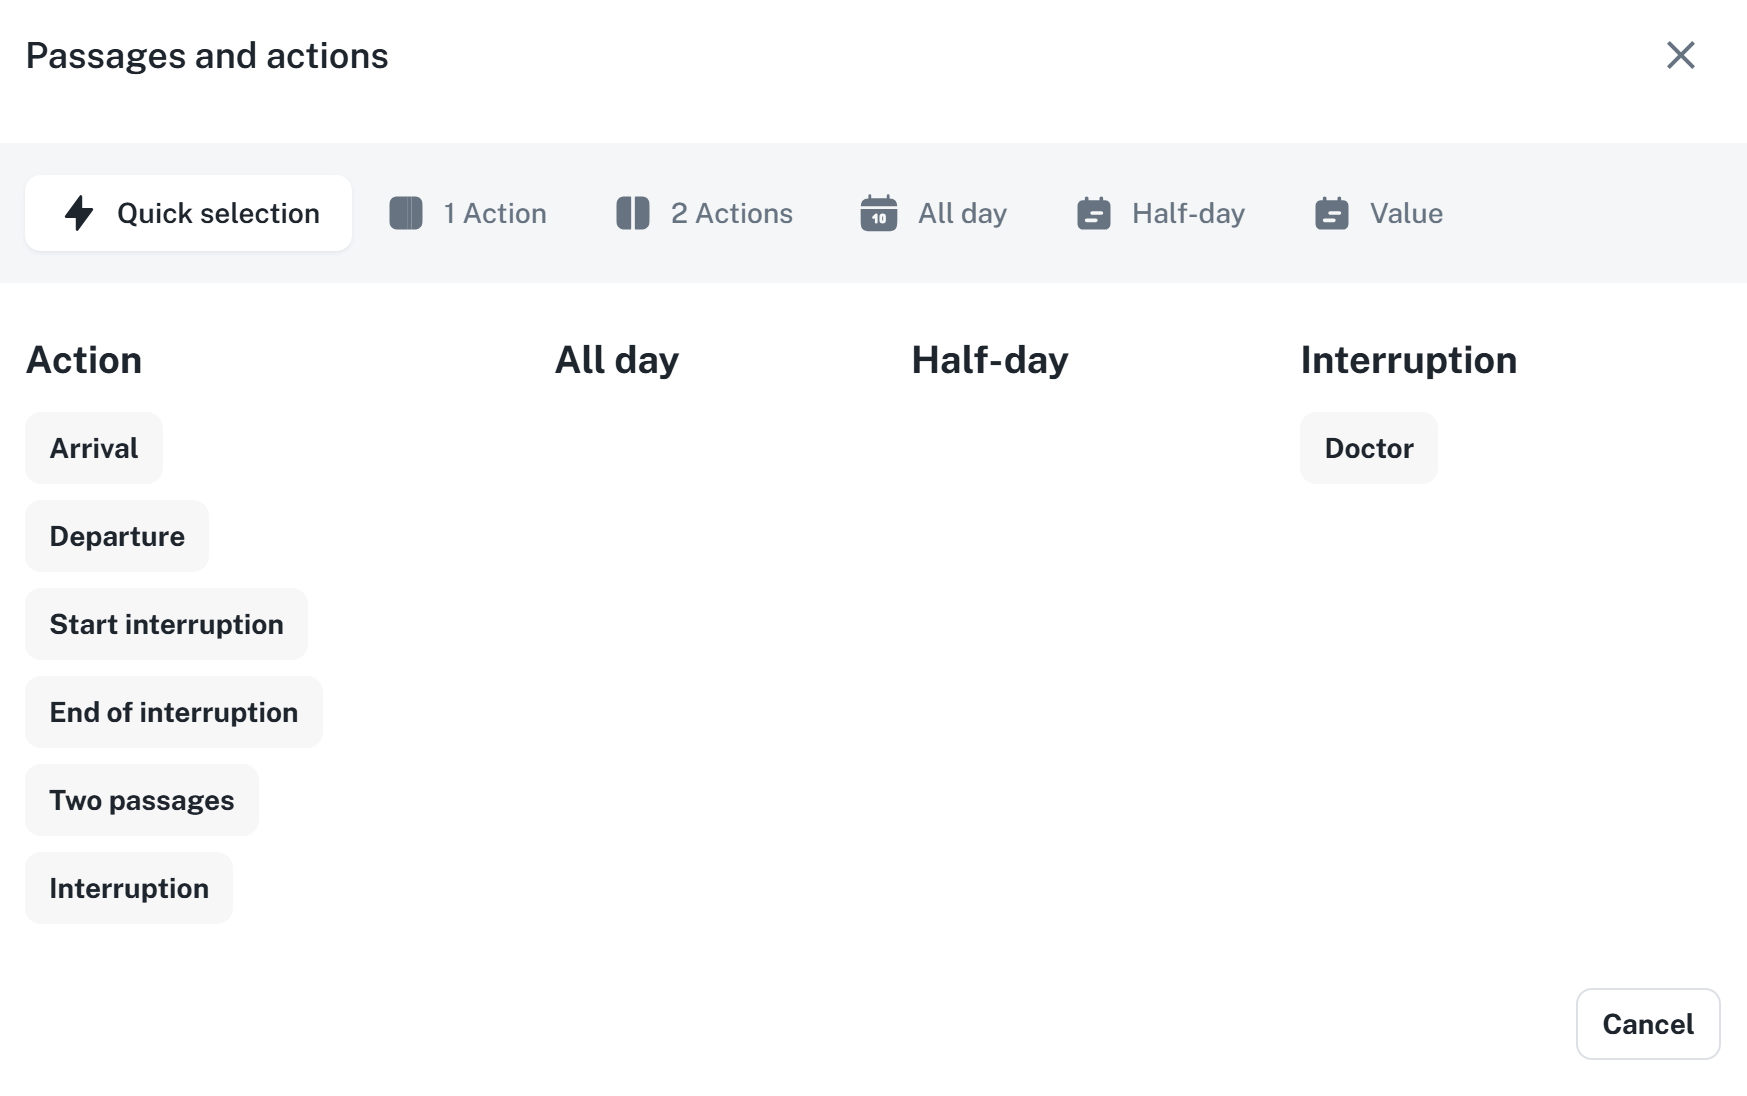
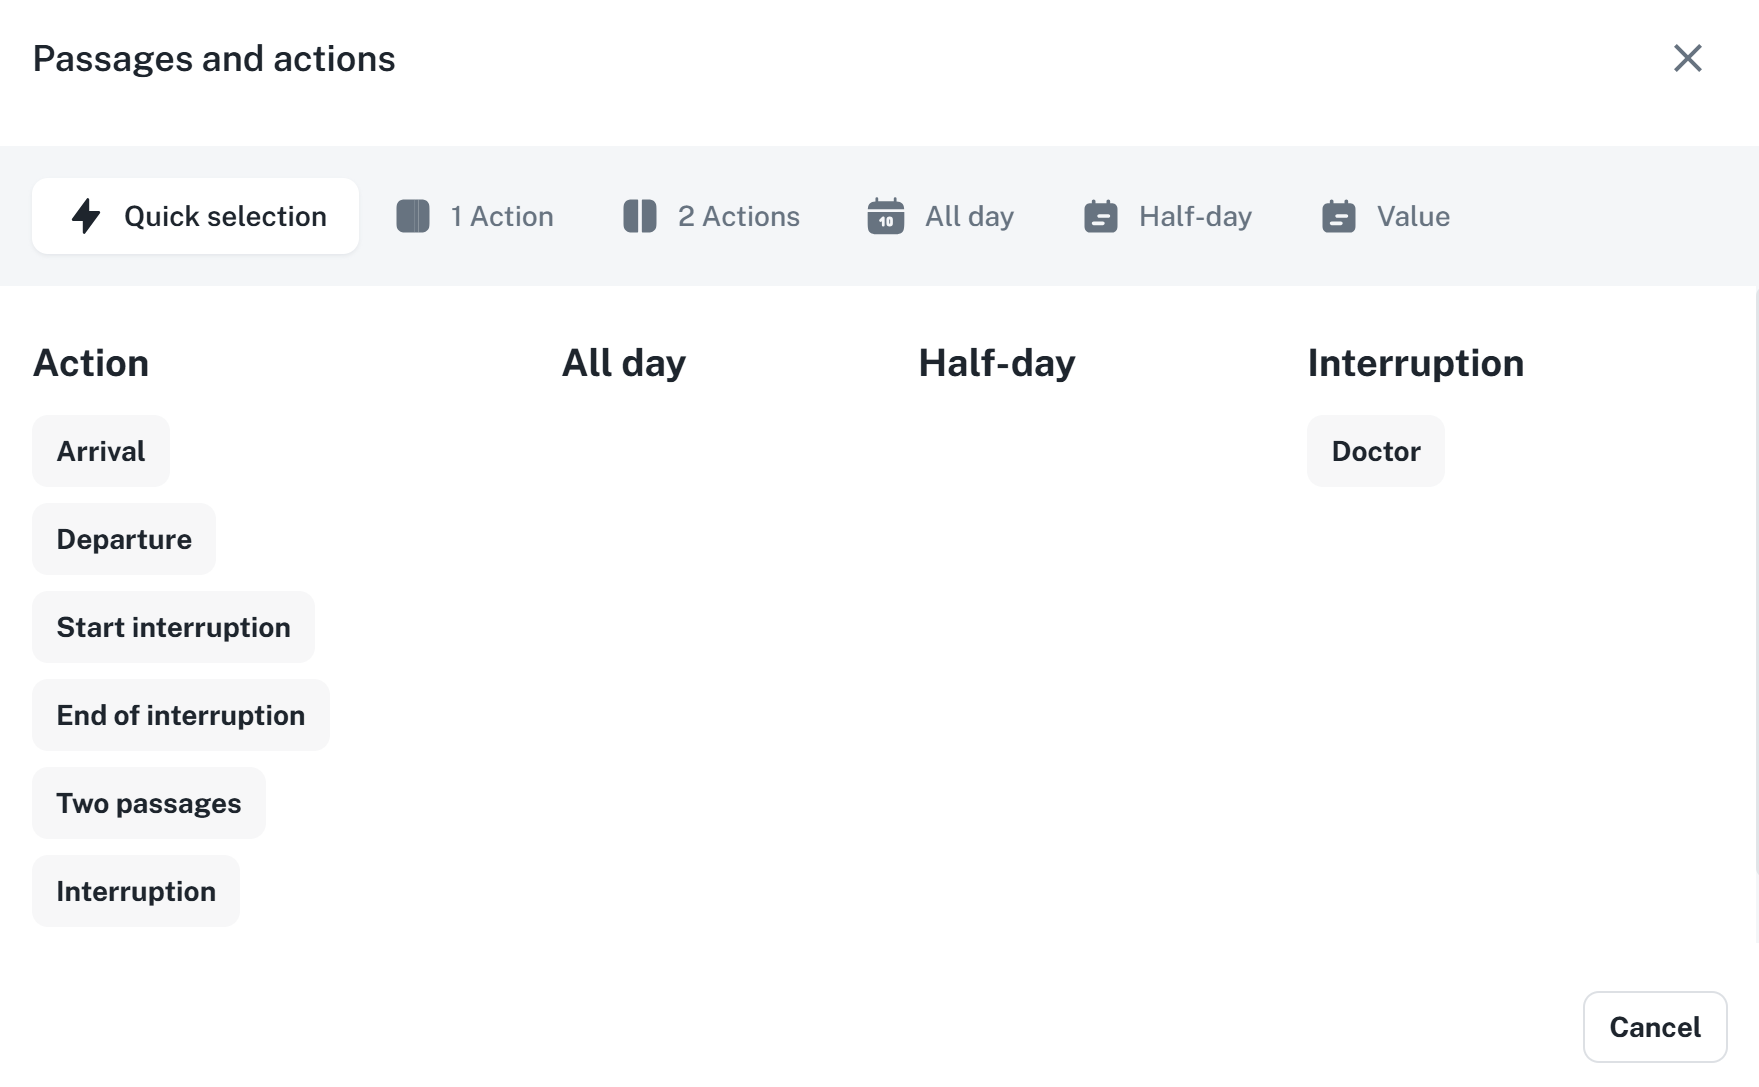
When adding a passage or action, a form will appear which consists of five tabs.
Quick Selection allows for quick selection of the action and speeds up the addition of passes.
1 Action allows you to register only Arrival/Departure/Start of interruption, etc. Suitable, for example, to supplement a forgotten recording.
2 Actions allows you to add two independent entries. For example, you can register both arrival and departure at the same time.
All day refers to full-day events such as Vacation, Business trip, Illness, etc. It is possible to define the interval of the event (date from / to) to be entered in the system, or by selecting Generate it will be entered automatically until the employee marks arrival on the attendance device.
Half-day registers a half-day event. This can be used, for instance, in the case of vacation or a combination such as vacation with compensatory leave.
No distinction – select this option if the direction of passage is not being distinguished.
Arrival – for entering the arrival value.
Departure – for entering the departure value.
Start interruption – enforce the start of an interruption. The situation is similar to the example below for End of interruption.
End of interruption – enforce the end of an interruption.
Example: the standard calculation for a business trip is set until 17:00, but it needs to be finished already at 15:00. With passes, it would be necessary to enter 2 unrealized actions (arrival from a business trip and departure home, respectively departure as worked). In this case, it is appropriate to use the End of interruption action at 15:00, which will terminate the generation of the business trip and also the attendance for that day.
Ignore rounding + Ignore limits - When adding a passage, it immediately sets the passage to ignore one or both of the selected functions.

Presence settings - The passage immediately sets the presence of the person; the "Zone" column is used to display which zone the person is in.

Generate time by shift - Usually used when adding passages for multiple days, this function ensures that times are generated according to a pre-planned shift.

Take times from the shift - Takes times according to the planned shift, based on the shift planned for the first event.

Cancel all others - Cancels other passages and events added for the given day.

Generate for the upcoming days - Generates an all-day event for multiple days.

Approve - If the value is also a value for approval and you have the permission to approve, this checkbox will appear. With this option, you approve the value immediately and there is no need to approve it later.

Do not insert on a day with a specified action/pass - does not insert an all-day event if an event is scheduled for that day or a passage is added.

Enter second half-day aswell - adds the second half-day for a half-day event.

This function allows you to insert an action (e.g., passage), or a value for multiple persons on the list at once. For instance, this can be used for company-wide holidays, joint business trips, granting vacation entitlements, or medical leave. However, it is first necessary to specify which persons will be affected by the record insertion.
Select the individuals by checking the box on the left
Click the Add action button

In the form, select the type of action
Fill in the parameters
Click the Save and recalculate
This function is used to close (lock) attendance data for one or more individuals at once.
For more detailed information, refer to the manual Closure:
Closure
This manual serves as a guide for closure. It explains the types of closure – Verification, Confirmation, Closure – and how to configure them.
It is possible to change the attendance regulation of individuals in bulk.
Select person(s)
Click the Mass regulation change button.

Select the attendance regulation. It is also possible to check the Custom box and fill in the details manually.
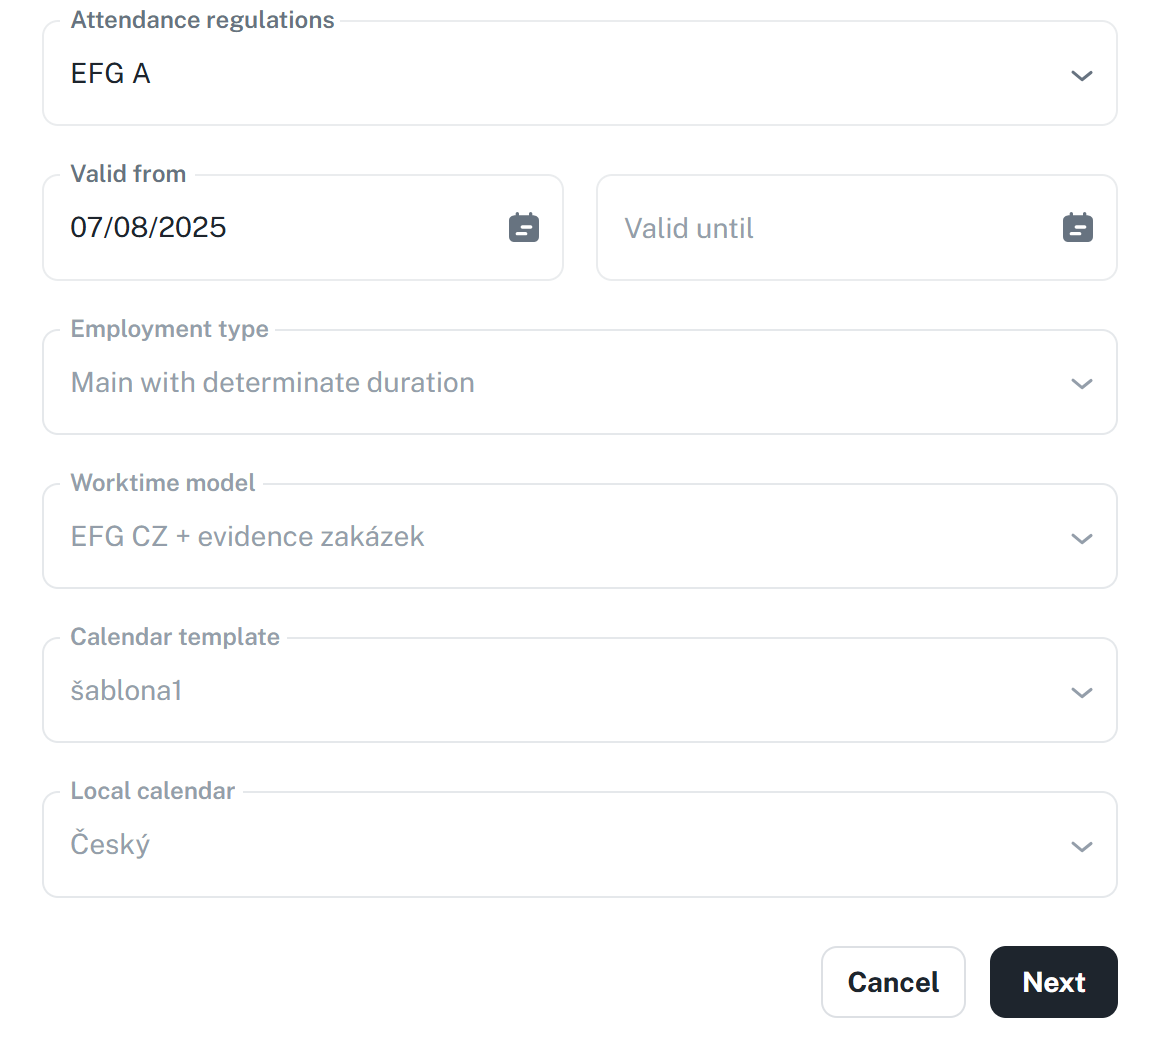
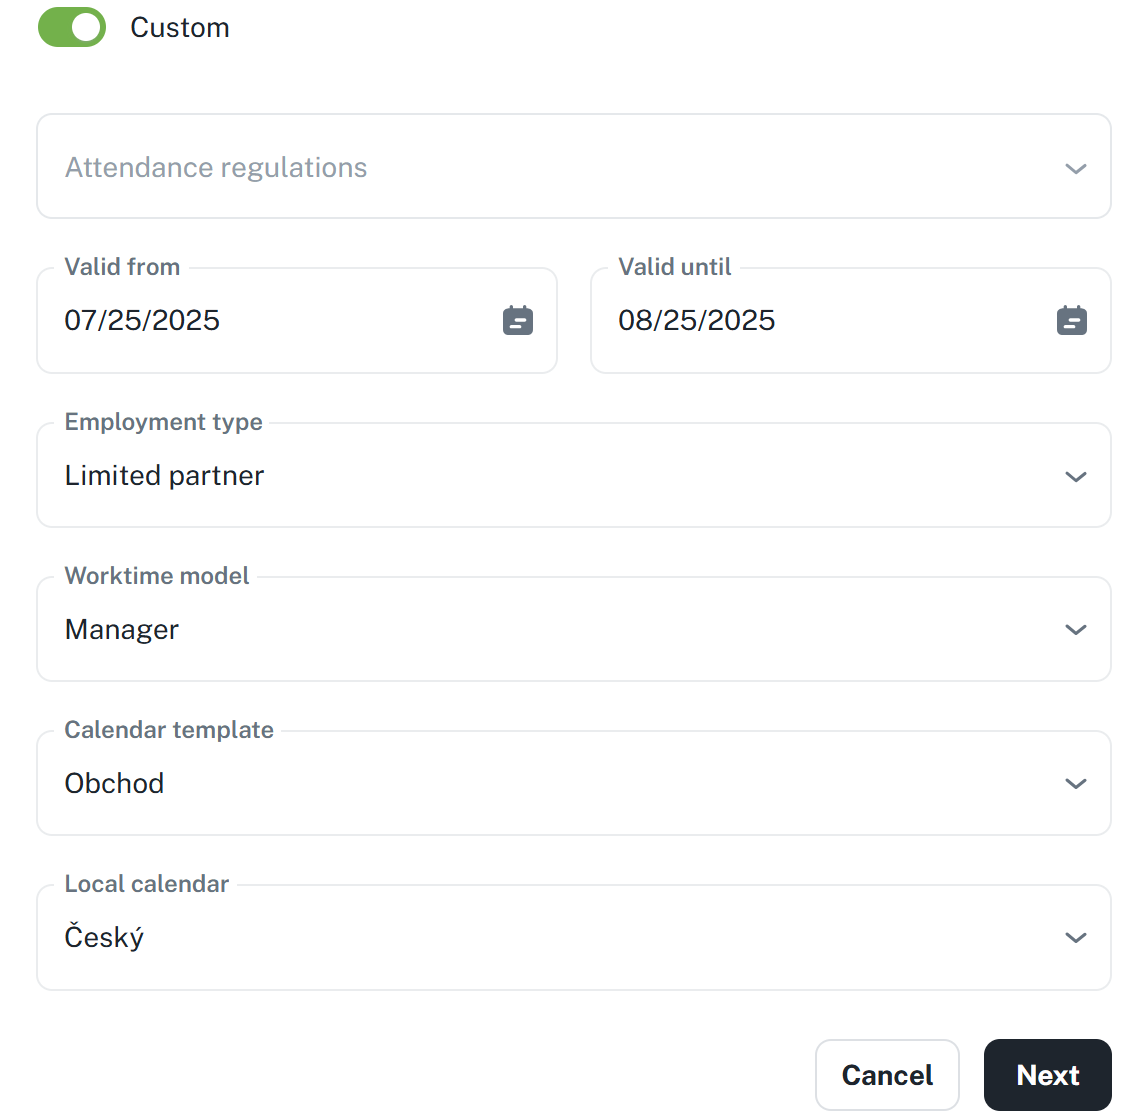
Click Next. The change should apply immediately.
